
-
လက်ရှိမှာ PC အသုံးပြုသူထက် Mobile Phone အသုံးပြုသူအရေအတွက်က ပိုမိုများနေလို့ Unicode ပြောင်းသုံးကြမည့် Mobile Phone သမားတွေအတွက် ဒီ Post ကိုရေးပေးလိုက်တာပါ။ အားလုံးပဲ အဆင်ပြေလွယ်ကူစွာနဲ့ Unicode ကို ပြောင်းလဲအသုံးပြုနိုင်ကြပါစေ။
ကဲ... စလိုက်ကြရအောင်...
မိမိတို့သုံးနေတဲ့ဖုန်းထဲက Browser ကိုသိကြတယ်မလား...?
သိတယ်ဆိုရင် Browser ကိုဖွင့် Address bar or Search box ထဲမှာ
MyanmarUnicodeSupport.blogspot. com ကို ( တဆက်ထဲ ) ရိုက်ထည့်ပြီး Go or Enter ကိုနှိပ်ပြီးဖွင့်။
Myanmar Unicode Support ဝဘ်ဆိုက်ထဲကိုရောက်သွားပြီဆိုရင်....
iOS အတွက်ဆို -
"How to add Unicode font and ttKeyboard for iPhone, iPad" ဆိုတဲ့ခေါင်းစဉ်နဲ့ Post ကိုရှာဖွင့်ပြီး လမ်းညွှန်ချက်အတိုင်းလုပ်။
လက်ရှိ ( 20.9.2019 နေ့ )မှာ Apple က iOS 13 ကို Update အနေနဲ့ထုတ်ပေးလိုက်ပါပြီ။ Keyboard အနေနဲ့ Build in Burmese Keyboard ဆိုပြီး မြန်မာကီးဘုတ်ထည့်ပေးလာပါတယ်။
ကီးဘုတ်အသစ်ကိုသုံးရန် Settings => General => Keyboard => Keyboards => Add New Keyboards မှာ Burmese ကိုရွေးပေးလိုက်ပါ။
iOS 13 မှာ Unicode ပြောင်းရန် Setting => General => Language & Region => Preferred Language Order ထဲကိုအဆင့်ဆင့်ဝင်ပြီး အောက်ဘက်က မြန်မာစာ ( Burmese ) ထဲကိုဝင်ပါ။ Standard ( Recommended ) ကိုရှာပြီး ရွေးပေးလိုက်ပါ။ Reboot ကျပီး ပြန်တက်လာရင် နောက်တစ်ခေါက် Restart ချပေးလိုက်ပါ။ အဲ့ဒါဆို Unicode ပြောင်းသွားပါပီ။
Fonts
- Custom fonts are available from the App Store for use in your favorite apps
- Font management in Settings
Language support
- Support for 38 new keyboard languages
- Predictive input in Cantonese, Dutch, Hindi (Devanagari), Hindi (Latin), Najdi Arabic, Swedish, and Vietnamese keyboards
- Separate emoji and globe keys make it easier to quickly switch between languages and select emoji on iPhone X and later
- Automatic language detection for dictation
- Bilingual dictionary support in Thai and English and Vietnamese and English
နောက်ထပ် ဘာ Features အသစ်တွေထပ်ပါလာလည်းသိချင်ရင်တော့
အသေးစိတ် About iOS 13 Updates => https://support.apple.com/en-us/HT210393 မှာဝင်ရောက်ကြည့်ရှုလိုက်ပါ။
Android အတွက်ဆို -
"How to add Gboard and TT keyboard for Android" ဆိုတဲ့ခေါင်းစဉ်နဲ့ Post ကိုရှာဖွင့်ပြီး လမ်းညွှန်ချက်အတိုင်းလုပ်ပါ။
Keyboard ကတော့ဟုတ်ပါပြီ Font ဘယ်လိုသွင်းရမှာလဲ ( Font Settings ကဘယ်လိုလုပ်ရမှာလဲ ) ဆိုရင် -
"How to add Unicode font for Android" ဆိုတဲ့ခေါင်းစဉ်နဲ့ Post ကိုရှာဖွင့်ပြီး မည်သည့်ဖုန်းအမျိုးအစားအတွက် Font Settings ကို မည်သို့ပြုလုပ်သည်ဆိုတာကို ကြည့်ရှုပြီး လိုက်ပါလုပ်ဆောင်လို့ရပါတယ်။ Android ဖုန်းတွေအတွက်ရော iOS အတွက်ပါ ပါဝင်ပါတယ်။
Unicode တော့ထည့်ပြီးပြီ SMS ( Phone Message ) တွေ၊ Phone Contacts တွေမှာက မြန်မာစာမမှန်ဘူးဖြစ်နေတယ်။ ဘယ်လိုလုပ်ရမလဲ...? ဆိုရင်တော့ "Android SMS and Utility ရယူရန်" ဆိုတဲ့ခေါင်းစဉ်နဲ့ Post ကိုရှာဖွင့်ပြီး ပေးထားတဲ့ App ကို Download ပြုလုပ်ပြီး Zawgyi နဲ့ပို့ထားတဲ့ SMS နဲ့ Zawgyi နဲ့မှတ်ထားတဲ့ Phone Contacts တွေကို အဲ့ဒီ App လေးအကူအညီနဲ့ အမှန်မြင်နိုင်ပါပြီ။ ( အကုန်လုံး Unicode သုံးလာကြပြီဆိုရင်တော့ မလိုတော့ဘူးပေါ့။ :D )
ဒီပို့စ်ထဲမှာ အကုန်ထည့်ပေးထားတာမဟုတ်ဘူးလို့လာပြောမှာစိုးလို့ တခါထဲပြောပေးလိုက်ပါ့မယ်ဗျ။ လက်ရှိ Post ထဲက Post ခေါင်းစဉ်လေးတွေမှာတော့ Link တွေချိတ်ပေးထားလို့ တိုက်ရိုက်နှိပ်ပြီးဝင်ကြည့်လို့ရပါတယ်။ Facebook မှာက Myanmar Unicode Support ( www.MyanmarUnicodeSupport.blogspot. com ) Website ကို Spam, Phishing ဝဘ်ဆိုက်လို့ထင်ပြီး ဘန်းထားတုန်းမို့ Website link ကို တိုက်ရိုက် Share လုပ်မရသေးလို့ ဒါလေးက Myanmar Unicode Support Website ကို ဘယ်လိုဝင်ရလဲ သိရအောင် ပရိုမိုးရှင်းလုပ်ပေးတဲ့သဘောပါပဲ။ :D
အဆင်မပြေတာများရှိပါက ....
m.me/MyanmarUnicodeSupport
m.me/aungkyawsoe.sb
တို့ကိုနှိပ်ပြီး မေးမြန်းစုံစမ်းပြီး အကူအညီတောင်းခံနိုင်ပါတယ်။
အားလုံးပဲ အဆင်ပြေကြပါစေ။
Aung Kyaw Soe ( 20.9.2019 - 1:27 PM )
-

-
ဒီရက်ပိုင်းထဲမှာ Facebook user တော်တော်များများမှာဖြစ်ပေါ်နေတဲ့ပြဿနာလေးကတော့ Comment ပေးမရတဲ့ပြဿနာလေးပါပဲ။ Comment ပေးလိုက်တာနဲ့ Error ( အနီစက် icon နဲ့ Error message ) ပြပြီး မန့်မရတဲ့အနေအထားဖြစ်သွားတဲ့အခါ တော်တော်များများက Facebook account ကဘာဖြစ်တာလည်းမသိဘူး Comment တွေပေးမရဘူး။ အကောင့်ပျက်တော့မှာလား၊ Lock ကျတော့မှာလား၊ Hack ခံနေရတာလားဆိုပြီး လာလာမေးကြပါတယ်။
တကယ်တော့အဲ့ဒီလိုဖြစ်တာဟာ အကြောင်း( ၂ ) ခုရှိပါတယ်။ တခုက Facebook policy တခုခုကိုချိုးဖောက်မိထားတာကြောင့်ဖြစ်ပြီး၊ နောက်တခုကတော့ Facebook ဆာဗာ or Mobile App ကြောင့်ဖြစ်တာပါ။ ဒါကြောင့် ဘယ်ဟာကြောင့်ပဲဖြစ်ဖြစ် ဖြေရှင်းလို့ရအောင် ဖြေရှင်းနည်းလေးကို ရေးပေးလိုက်ပါတယ်။ သေခြာဖတ်ကြည့်ပြီး လိုက်လုပ်ကြည့်လိုက်ပါဦး။
1. Facebook Policy တခုခုကိုချိုးဖောက်မိလို့ Temporary blocked မိခဲ့ရင် ဘာလုပ်ရမလဲ...?
Temporary blocked ဖြစ်ခဲ့ရင် Status Post တွေတင်မရ၊ Like, Comment, Share, တွေလုပ်မရ၊ Messenger မှာ စကားပြောလို့မရ၊ ဖြစ်တတ်ပါတယ်။ အဲ့လိုဖြစ်ခဲ့ရင် အနည်းဆုံး ၂၄ နာရီ၊ ၇၂ နာရီ၊ ၁ ပတ်၊ ၂ ပတ်၊ ကနေ ရက် ၃၀ လောက်အထိ Temporary Blocked မိတတ်ပါတယ်။ အဲ့လိုဖြစ်ခဲ့ရင် သူ့သတ်မှတ်ရက်ပြည့်တော့မှပဲ လုပ်လို့မရတာတွေ ပြန်လုပ်လို့ရပါတယ်။ သတ်မှတ်ချိန်မပြည့်ခင် ဖြေရှင်းလို့ရတဲ့နည်းလမ်းရောမရှိဘူးလားဆိုရင် ရှိတော့ရှိပါတယ်။ ဒါပေမယ် 100% အဆင်ပြေချင်မှပြေပါတယ်။
ဘယ်လိုဖြေရှင်းလို့ရနိုင်လဲ...?
အရင်ဆုံး ကိုဖြစ်နေတာလေးတွေကို SS ရိုက်ပြီး Facebook Menu ထဲက Help & Support ထဲကိုဝင်၊ အထဲရောက်ရင် Report a Problem ဆိုတာကိုနှိပ် Facebook က ဖုန်းကိုလှုပ်ပြီး Shake ခိုင်းနေတာလေးတွေ့ပါမယ်။ မ Shake ပဲ အဲ့ဒီအောက်နားက Report a Problem ဆိုတာလေးကိုထပ်နှိပ်ပေးရပါမယ်။
နောက်တဆင့်မှာ Where is the problem? ဆိုတဲ့ခေါင်းစဉ်အောက်မှာ ရွေးချယ်စရာခေါင်းစဉ်တွေအများကြီးတွေ့ပါလိမ့်မယ်။ ကိုယ်က ဘယ်ဟာနဲ့ပတ်သက်ပြီး Report တင်ချင်တာလည်းဆိုတာကိုရွေးချယ်ရမှာပါ။ ဥပမာ ကိုယ်က Status တင်မရဘူးဆို Status Update ကိုရွေးချယ်ပေးရမှာဖြစ်ပြီး၊ Photo, Video, Message, တွေနဲ့ပတ်သက်ပြီး Error တက်နေရင် သက်ဆိုင်ရာခေါင်းစဉ်ကိုပဲရွေးချယ်ပေးရမှာပါ။
နမူနာအနေနဲ့ Status Update ကိုရွေးလိုက်တယ်ဆိုပါစို့ နောက်တဆင့်မှာ What Happened? ဆိုတာလေးအောက်မှာ စာရေးထည့်ဖို့နဲ့ Screenshot ထည့်ဖို့လေး ပါ ပါတယ်။ ကိုယ်ဖြစ်နေတာကိုရေးပြီး SS လေးထည့်ပြီး Send လုပ်ပေးထားလိုက်ရုံပါပဲ။ အဲ့ဒါဆို အနည်းဆုံး ၂၄ နာရီ၊ ၇၂ နာရီ၊ ၁ ပတ်၊ ၂ ပတ်၊ ကနေ ရက် ၃၀ လောက်အထိ Temporary Blocked မိနေခဲ့တယ်ဆိုရင်တောင် ခနလေးနဲ့ပြန်ရသွားတတ်ပါတယ်။
2. ကိုယ်က Facebook Policy တခုမှမချိုးဖောက်မိ(အမှားမလုပ်မိ)ပဲ Facebook ဆာဗာ or Mobile App ကြောင့် Temporary Blocked ပုံစံမျိုးဖြစ်နေခဲ့တယ်ဆိုရင်...?
ကိုယ်က Facebook ကချမှတ်ထားတဲ့ စည်းမျဉ်း၊ စည်းကမ်း၊ မူဝါဒတွေကို လုံးဝမှချိုးဖောက်ထားခြင်းမရှိပဲ Status Post တွေတင်မရ၊ Like, Comment, Share, တွေလုပ်မရ၊ Messenger မှာ စကားပြောလို့မရ၊ ဖြစ်နေခဲ့တယ်ဆိုရင်တော့ ဖေ့ဘွတ်ဆာဗာနဲ့ မိုလ်ဘိုင်းအပ် တွေကြောင့်ဖြစ်တာမျိုးရှိတတ်ပါတယ်။
အဲ့လိုဖြစ်နေရင် ဘယ်လိုဖြေရှင်းလို့ရနိုင်လဲ...?
ကိုသုံးနေတဲ့ Facebook app, Messenger app, Other Facebook နဲ့ပတ်သက်တဲ့ App တွေကို Update ဖြစ်မဖြစ်အရင်စစ်ကြည့်ပြီး Update မြှင့်ဖို့လိုပါမယ်။ ဘာကြောင့်လည်းဆိုတော့ Version အသစ်ထွက်လာချိန် Update မလုပ်မိရင် ကိုယ်သုံးနေတဲ့ App က Out of Date ြဖစ်ပြီး ဆာဗာကနေ ကိုယ်သုံးနေတဲ့ Device ကနေ Support လုပ်မပေးနိုင်တော့တဲ့အခါ Error လေးတွေဖြစ်တတ်ပါတယ်။ ဒါကြောင့် Update လုပ်ပြီး ပြန်သုံးကြည့်ပါ။
Update တော့လုပ်ထားတယ်၊ အဆင်မပြေသေးဘူး၊ Error တက်နေတုန်းပဲဆိုရင် Login နဲ့ Log Out ကို ၂ ခါ၊ ၃ ခါ၊ လောက်လုပ်ကြည့်ပါ။
အဲ့ဒါမှအဆင်မပြေသေးဘူးဆိုရင်တော့...
iOS Device ဆို App ကိုဖျက် အသစ်ပြန်ဒေါင်းထည့်ပြီးပြန်သုံးကြည့်ပါ။
Android Device ဆို Settings => App => Facebook ထဲကိုဝင်ပြီး Clear cache နဲ့ Clear data လုပ်ပြီး ပြန်ဝင်သုံးကြည့်ပါ။
သတိပြုရန်// ဒီနေရာမှာ App ကိုဖျက်တာတို့၊ Clear data တို့မလုပ်ခင်မှာ တခုသတိထားရမှာက
နံပါတ်( ၁ ) Facebook Password ကိုမေ့နေလို့မရပါဘူး။
နံပါတ်( ၂ ) Two-Factor ( Login Approved ) Code ခံထားတယ်ဆို Backup Code ( Recovery Code ) ကိုအရင်ယူထားဖို့လိုပါတယ်။
ဘယ်ကဝင်ယူရမှန်းမသိဘူးဆိုရင်...
Facebook ထဲက Settings => Security and login => Use Two-Factor authentication ထဲဝင် အောက်နားကိုဆင်းပြီး Backup Code ( Recovery Code ) ဆိုတာလေးကိုနှိပ်ပီး Code 10 လုံးကို SS ရိုက်ပြီးတော့ဖြစ်စေ၊ ချရေးပြီးတော့ဖြစ်စေ၊ ယူထားလိုက်လို့ရပါတယ်။
ကဲ.... Facebook password ကိုလည်းမှတ်မိတယ်။ Backup Code ( Recovery Code ) လည်းယူထားပြီးပြီဆိုရင်တော့ လက်ရှိတက်နေတဲ့ Error လေးကို ဖြေရှင်းကြည့်လိုက်ပါဦး။
အားလုံးပဲ အဆင်ပြေကြပါစေ။
-

Face App လေးတွေသုံးပြီး ပေါ်ပင်မှာပျော်ရွှင်နေကြသူတွေအနေနဲ့ အဲ့ဒီ Face App ဟာ ၂၀၁၇ မှာ ရုရှားကုမ္ပဏီတခုကထုတ်လုပ်ထားတာဖြစ်ပြီး၊ ထုတ်လုပ်သူက Privacy, Security, တွေကိုအလေးထားပါတယ်ပြောထားပေမယ့် လုံးဝမှ Safe မဖြစ်တဲ့ App တခုဆိုတာ သိထားစေချင်ပါတယ်။
အဲ့ဒီ App ကို ကိုယ့်ဖုန်းထဲမှာ Insatll စသွင်းလိုက်ကတည်းက ဖုန်းထဲမှာရှိတဲ့အချက်အလက်တွေကို အကုန်စုဆောင်းပြီးရယူထားလိုက်တာပါ။ သူတို့ ဆာဗာနဲ့ တိုက်ရိုက်ချိတ်ဆက်ထားလို့ ကိုယ့်ဖုန်းထဲက Phone contacts, Message, Photo, Video, and all user data ေတြကုိ သူတုိ႔ဆာဗာဆီကုိကုိယ္မသိပဲပုိ႔ေဆာင္ေနေစပါတယ္။
ပြောရမယ်ဆိုရင် အဲ့ဒီ Face App ကို ဖုန်းထဲထည့်ထားသမျှကာလပတ်လုံး
ကိုယ်ပြောသမျှဆိုသမျှ လုပ်သမျှတွေကို သူတို့သိနိုင်နေပါတယ်။
ပိုပြီးစိတ်ဝင်စားဖို့ကောင်းတာက Face App ကိုသုံးပြီး Upload လုပ်လိုက်တဲ့ကိုယ့်ပုံက ရုရှားအစိုးရဆီကိုတိုက်ရိုက်ပို့ပေးနေတယ်ဆိုတာပါပဲ။ US အစိုးရနဲ့ US Security ပိုင်းကထောက်ပြနေတာကတော့ ဒီ App ဟာ နိုင်ငံရေးအကျိုးအမြတ်အတွက်လုပ်ဆောင်ထားတဲ့( User data တွေကို ခိုးယူစုဆောင်းနေတဲ့ လူတွေကိုစောင့်ကြည့်ဖို့လုပ်ထားတဲ့ ) App တခုလို့ပါ စွပ်စွဲပြောဆိုထားပါသေးတယ်။
ဒါေၾကာင့္ အေကာင္းဆုံးကေတာ့ ေတြ႔ကရာ App ေတြကုိေလွ်ာက္မသုံးေလေလ ကုိယ့္အခ်က္အလက္ေတြအတြက္စိတ္ခ်ရေလပဲမုိ႔ ပေါ်ပင်မှာပျော်ရွှင်တတ်ကြတဲ့စိတ်နဲ့ အလေ့အထများကို လျှော့ကြပါလို့ပဲပြောချင်ပါတယ်။
Aung Kyaw Soe ( 19.7.2019 - 7:00 PM )
#FaceApp #FaceAppIsSafeOrNotSafe #FaceAppIsNotSafe
ပိုပြီးစိတ်ဝင်စားဖို့ကောင်းတာက Face App ကိုသုံးပြီး Upload လုပ်လိုက်တဲ့ကိုယ့်ပုံက ရုရှားအစိုးရဆီကိုတိုက်ရိုက်ပို့ပေးနေတယ်ဆိုတာပါပဲ။ US အစိုးရနဲ့ US Security ပိုင်းကထောက်ပြနေတာကတော့ ဒီ App ဟာ နိုင်ငံရေးအကျိုးအမြတ်အတွက်လုပ်ဆောင်ထားတဲ့( User data တွေကို ခိုးယူစုဆောင်းနေတဲ့ လူတွေကိုစောင့်ကြည့်ဖို့လုပ်ထားတဲ့ ) App တခုလို့ပါ စွပ်စွဲပြောဆိုထားပါသေးတယ်။
Face App မှ မဟုတ်ပါဘူး။ Mobile app တော်တော်များများဟာ ရေးသားထားတဲ့ App dev. တွေရဲ့ သုံးစွဲသူ User တွေဆီကနေ ဘယ်လိုအကျိုးအမြတ်တွေရယူဖို့ထိကြိုးစားထားတယ်ဆိုတဲ့အပေါ်မူတည်ပြီး နည်းပညာနဲ့ဝန်ဆောင်မှုပေးရင်း အချက်အလက်တွေပြန်လည်ရယူကြတာများပါတယ်။ User data တွေစုဆောင်းပြီးပြန်လည်ရောင်းချတာ၊ ကြော်ငြာတွေပြပြီးပိုက်ဆံရှာတာ၊ Rat, Trojan, ရိုးရိုး Malware, ad Malware တွေ Virus အမျိုးမျိုးထည့်သွင်းတာ၊ နောက်ဆုံး Phishing app ဖန်တီးပြီး User data တွေ ထိုင်ခိုးတာအထိပါလုပ်တတ်ကြပါတယ်။
ဒါေၾကာင့္ အေကာင္းဆုံးကေတာ့ ေတြ႔ကရာ App ေတြကုိေလွ်ာက္မသုံးေလေလ ကုိယ့္အခ်က္အလက္ေတြအတြက္စိတ္ခ်ရေလပဲမုိ႔ ပေါ်ပင်မှာပျော်ရွှင်တတ်ကြတဲ့စိတ်နဲ့ အလေ့အထများကို လျှော့ကြပါလို့ပဲပြောချင်ပါတယ်။
Aung Kyaw Soe ( 19.7.2019 - 7:00 PM )
#FaceApp #FaceAppIsSafeOrNotSafe #FaceAppIsNotSafe
မူရင်းပို့စ် =>

တော်တော်များများ ဘယ် Mobile Operator တွေက ဘေလ်တွေကိုဘယ်လိုခိုးနေပါတယ်ဆိုပြီးပြောနေတာမျိုးတွေကို ကိုယ့်ပတ်ဝန်းကျင်မှာ ခနတိုင်းမြင်တွေ့ကြားသိနေကြမှာပါ။ ကျွန်တော်လည်း သက်ဆိုင်ရာ Mobile Operator တွေရဲ့Page တွေက Comment တွေမှာ မန် ့ထားတာတွေမြင်တွေ့တော့တွေးမိသေးတယ်၊ အော်ပရေတာတွေကတော့မခိုးလောက်ပါဘူး၊ ဖုန်းထဲမှာထည့်ထားတဲ့ App တွေက နောက်ကွယ်မှာ Run နေပြီး ဘေလ်တွေကိုစားနေတာပဲဖြစ်မှာပါဆိုပြီးတော့ပေါ့။

ဒါပေမယ့် ဒီရက်ပိုင်းထဲမှာ သတိထားမိလာတာက ဖုန်း Message ထဲကို
Thank you, your payment of 450 Ks + tax for ဘာညာ
Thank you, your payment of 300 Ks + tax for ဘာညာ
ဘာညာ Successful subscription for K 300.0/wk Auto renewal on 2019-လ-ရက်
ဆိုပြီး ကိုယ်လည်း ဘာမှမဝင် ဘာမှ subscribe မလုပ်ပါပဲနဲ့ Message တွေဝင်ဝင်လာပြီး ကိုယ့်ဖုန်းဘေလ်ထဲကနေ ဖုန်းဘေလ်တွေဖြတ်ဖြတ်သွားတယ်။
ဝင်လာတာတွေကြည့်လိုက်ရင်
1. GamerHeaven
2. One97
3. Disney
4. D.Magic
5. Guess It
6. GameMania
7. Forest
8. Quest to Million
9. GameZTwo
ဆိုပြီးဝင်လာတာတွေကများနေတယ်။


 တကယ္ဆုိ ကျွန်တော့်အနေနဲ
့အဲ့ဒါမျိုးတွေကိုလုံးဝမှ မယူထားဖူးဘူး။ ဘယ်ဂိမ်းလေးတွေဆော့လို
့ရတယ်ဆိုတာတွေလည်း တခုမှဝင်မဆော့ဖူးဘူး။ ဘယ်နံပါတ်ကိုဘာလေးပို့လိုက်ရင်
ဘာတွေကံထူးမယ်ဆိုတာမျိုးတွေကိုလည်း ဘာမှပြန်မပို့ဖူးဘူး။
ကျွန်တော်လုပ်ဖူးတာဆိုလို့ Data Package လေးတွေဝယ်သုံးတာမျိုးပဲရှိတယ်။
တကယ္ဆုိ ကျွန်တော့်အနေနဲ
့အဲ့ဒါမျိုးတွေကိုလုံးဝမှ မယူထားဖူးဘူး။ ဘယ်ဂိမ်းလေးတွေဆော့လို
့ရတယ်ဆိုတာတွေလည်း တခုမှဝင်မဆော့ဖူးဘူး။ ဘယ်နံပါတ်ကိုဘာလေးပို့လိုက်ရင်
ဘာတွေကံထူးမယ်ဆိုတာမျိုးတွေကိုလည်း ဘာမှပြန်မပို့ဖူးဘူး။
ကျွန်တော်လုပ်ဖူးတာဆိုလို့ Data Package လေးတွေဝယ်သုံးတာမျိုးပဲရှိတယ်။ ဒီတော့ တွေးမိတယ်၊ အဲ့ဒါတွေအလိုလျှောက် Subscription ဖြစ်အောင်လုပ်တာက အော်ပရေတာတွေကိုယ်တိုင်ပဲဖြစ်လိမ့်မယ်ဆုိတာပါပဲ၊ ကိုယ်လည်းမသိပါပဲ ကိုယ်မယူထားတဲ့အစီအစဉ်တွေကို ကိုယ့်ဖုန်းနံပါတ်နဲ ့အလိုလျောက်ယူပြီးသားဖြစ်အောင်လုပ်နိုင်တာက အော်ပရေတာတွေပဲရှိမယ်။
Data Package တွေကိုဝယ်ယူတိုင်း နောက်ကွယ်က အဲ့လိုအစီအစဉ်တွေကို Subscribe လုပ်ပြီးသားဖြစ်သွားအောင်လုပ်ထားပုံရတယ်၊ အဲ့ဒါဆိုရင် အများပြောသလို အော်ပရေတာတွေက ဘေလ်တွေကိုတကယ်ခိုးနေတယ်လို့ပဲသတ်မှတ်ရတော့မယ်။ ဖုန်းမခေါ်၊ အင်တာနက်မသုံးပဲ၊ အဲ့ဒီလို Message တွေဝင်လာပြီး ဖုန်းဘေလ်ထဲက ပိုက်ဆံတွေလျော့လျော့သွားတာဟာ အော်ပရေတာတွေရဲ့မလိမ့်တပတ်နဲ ့ခိုးယူမှုတွေလို့ပဲပြောရမှာပါ။
လက်ရှိကျွန်တော်သုံးတဲ့အော်ပရေတာက ၂ ခုပဲရှိတော့ တတ်နိုင်သလောက်တော့ Unsubscribe လိုက်လုပ်ထားတယ်။ အခြားသူတွေလည်း ကိုယ့်ဖုန်းနံပါတ်နဲ့ ကိုယ်မယူပဲ ( ကိုယ်မသိပဲ ) ဘာအစီအစဉ်တွေယူထားမိလည်းစစ်ဆေးကြည့်ကြပါ၊ ကိုယ့်ဖုန်း Message ထဲကို အပေါ်မှာ ကျွန်တော်ပြောထားသလို ဘာလေးယူလိုက်လို့၊ ဘာလေးယူထားလို ့ဘယ်လောက်ဖြတ်လိုက်ပါပြီဆိုပြီးဝင်လာနေတာတွေရှိနေရင် သေခြာပါတယ် ဖုန်းဘေလ်တွေအခိုးခံနေရပါပြီ။
ကဲ... စစ်ဆေးပြီး ဖုန်းဘေလ်တွေအခိုးမခံရအောင်ကာကွယ်လိုက်ကြပါ။
Telenor နံပါတ္အတြက္ကေတာ့ *979*3*2# Call ကိုခေါ်ပြီး ယူထားတဲ့အစီအစဉ်တွေဆိုတာကို
Unsubscribe လေးတွေလုပ်ပစ်လို့ရပါတယ်။ MPT, Ooredoo, Mytel, တွေကတော့ ဘာနဲ့လုပ်လည်းမသိဘူး။
အားလုံးပဲ အော်ပရေတာတွေရဲ့မလိမ့်တပတ်နဲ့ဘေလ်ခိုးယူခံရခြင်းမှ ကင်းဝေးကြပါစေ။

လူသုံးများတဲ့ App တွေ၊ အသစ်အဆန်းလေးအနေနဲ့ပေါ်လာတဲ့ App တွေကို လက်လွတ်စပါယ်အသုံးမပြုသင့်ပါဘူး။ ဘာကြောင့်လည်းဆိုတော့ အခု ဒီဗီဒီယိုလေးထဲမှာပြောပြထားသလိုပါပဲ App တွေတိုင်းက User info တွေကို တောင်းခံတယ်၊ စုဆောင်းတယ်၊ ပြန်လည်အသုံးချတယ်၊ App ကိုဖုန်းထဲထည့်ပြီး Install စသွင်းလိုက်တာနဲ့အသုံးပြုမည့်သူဆီကပါမစ်တောင်းတာရှိသလို၊ ပါမစ်မတောင်းပဲသူ့ဘာသာလုပ်ချင်ရာဝင်လုပ်သွားတာမျိုးတွေလည်းရှိပါတယ်။
App တစ်ခုကို Install သွင်းတိုင်း လူအယောက် 100 မှာ 99 ယောက်လောက်က ဒီ App က ဘာတွေပါမစ်တောင်းထားလည်းဆိုတာ စစ်ဆေးခြင်းမျိုး လုံးဝမှမရှိပဲ ကိုယ့်ဖုန်းထဲဝင်သွားပီးရောဆိုပြီး ဖြစ်သလိုပဲ Install လုပ်ပစ်လိုက်ကြတာများပါတယ်။ အဲ့လိုဆိုရင် ဘာတွေဖြစ်နိုင်လည်းဆိုတော့ ကိုယ်မသိပဲ နောက်ကွယ်ကနေ ကိုယ့်အချက်အလက်တွေကိုခိုးယူနေတာမျိုးတွေ၊ ပြန်လည်အသုံးချနေတာမျိုးတွေ၊ ပြုလုပ်နေနိုင်ပါတယ်။ Phishing app မျိုးတွေဆိုရင်တော့ App ကိုစသုံးလိုက်ကတည်းက ကိုယ့် User name and Password ကို တစ်ဖက်ကို ပို့ပြီးသားဖြစ်သွားပါပြီ။
ပိုက်ဆံပေးရတဲ့ App နဲ့Free ပေးတဲ့ App ဘယ်ဟာက Safe ဖြစ်လဲ...?
ငါသုံးတဲ့ App က ဝယ်သုံးထားတာကွ၊ ဘယ်လောက်တောင်ပေးထားရတယ်၊ မင်းတို့က Free ရတဲ့ App တွေကိုသုံးတာဖြစ်မှာပေါ့ဆိုပြီး ဝယ်သုံးတာနဲ့ဝယ်မသုံးတာနဲ ့အပေါ်မှာခွဲခြားမှုလုပ်နေလို့မရပါဘူး။ မည့်သည့် App မဆို User info တွေကို တောင်းခံတယ်၊ စုဆောင်းတယ်၊ ပြန်လည်အသုံးချတာမျိုးတွေ လုပ်ကြတာချည်းပါပဲ၊ နည်းနည်းစီပဲကွာပါမယ်။
ကွာခြားမှုက ဘာကွာနိုင်လဲဆိုတော့ ဝယ်သုံးထားတဲ့ App ထဲမှာ Ads(ကြော်ငြာ)ပါဝင်မှုနည်းပြီး မပါတာများပါတယ်။ Free ပေးထားတဲ့ App တွေမှာတော့ Ads(ကြော်ငြာ)တွေထည့်သွင်းထားတာများပါတယ်။ Free ပေးထားတဲ့ App 100 မှာ 99 လောက်က ကြော်ငြာတွေထည့်သွင်းကြပါတယ်။
iOS နဲ့ Android ကွာခြားရင်ရော Safe ဖြစ်နိုင်လား...?
ငါက iOS သုံးတာကွ မင်းတို့လို Android သုံးတာမဟုတ်ဘူး၊ အဲ့ဒါကြောင့် အဲ့လိုတွေတော့မဖြစ်နိုင်ဘူးဆိုပြီး ကြွေးကြော်နေလို့မရပါဘူး။ လူသုံးများတဲ့ App တွေကို iOS အတွက်ရော Android အတွက်ပါရေးသားပေးထားကြတာများပါတယ်။ ဘယ် OS ပဲသုံးသုံး ဂျင်းထည့်တာတွေနဲ ့ကြုံတွေ့နိုင်ပါတယ်။
iOS app store developer account ဆိုရင် $99 ကနေ $299 ရှိပါတယ်။
Android app developer တွေအတွက် Play store account က $25 ပဲရှိပါတယ်။
ဒီတော့ အဲ့ဒီငွေလောက်ရင်းပြီး အဲ့ဒီထက်ပိုရနိုင်တာကိုသိထားတဲ့ App developer တွေ Hacker တွေ Attacker တွေအနေနဲ့ကတော့ အဲ့လောက်ကိုရင်းပြီး သူတို့လိုချင်တာရဖို့လုပ်နေဆဲ၊ လုပ်နေမြဲပါပဲ၊ User data တွေကို စုဆောင်းချင်လို့( လိုချင်လို့)ရေးထားတဲ့ App တွေ၊ Ads(ကြော်ငြာ)တွေထည့်ပြီး ငွေရှာဖို့အတွက်ရေးထားတဲ့ App တွေဆိုတာ အများကြီးမှ အများကြီးပါပဲ။
ဒါဆို Safe ဖြစ်အောင်ဘာတွေဆောင်ရ၊ ရှောင်ရမလဲ...?
ဘယ် OS( iOS or Android ) ကိုပဲသုံးသုံး App တွေဆိုတာကတော့ မသုံးမဖြစ်သုံးနေရတာတွေရှိသလို၊ အမှန်တကယ်လိုအပ်လို့သုံးနေရတဲ့ App တွေလည်းရှိပါတယ်။ ဒီတော့ Safe ဖြစ်စေချင်တယ်ဆိုရင် ကိုယ်သုံးတဲ့ App တွေဟာ Official app ဟုတ်ရဲ့လားဆိုတာမျိုးတွေကိုလည်းစစ်ဆေးကြည့်ဖို့လိုပါတယ်။
နမူနာအနေနဲ့လူသုံးများတဲ့ App တွေဆိုရင် Facebook, Messenger, Viber, Camera360, VivaVideo, လိုမျိုးတွေသုံးတယ်ဆိုပါစို့ ကိုယ့်ဖုန်းထဲမှာ အဲ့ဒီ App တွေကိုဒေါင်းထည့်ချင်လို့သက်ဆိုင်ရာ App store ( Google Play Store, Apple Store ) တွေထဲကိုဝင်ပြီး အဲ့ဒီနာမည်တွေနဲ့ရိုက်ရှာလိုက်ရင် နာမည်တူ၊ ပုံစံတူ၊ App တွေအများကြီးထွက်လာတာမျိုးတွေ တွေ့ဖူးကြမှာပါ။ အဲ့ဒါတွေက ဂျင်းတွေများပါတယ်။ အဲ့ဒီ ဂျင်း App တွေထဲက တကယ့် Official app ကိုသာ သေခြာလေးစစ်ဆေးရွေးချယ်ပြီး Download ပြုလုပ်အသုံးပြုသင့်ပါတယ်။
အကောင်းဆုံးကတော့ သူများသုံးနေတာမြင်ပြီးသဘောကျလို့ပဲဖြစ်ဖြစ်၊ ကိုယ်တိုင်က အသစ်အဆန်းဆိုရင်သဘောကျလို့ပဲဖြစ်ဖြစ်၊ ဟို App ဆိုလည်းဒေါင်းထည့်ပြီးသုံးလိုက်၊ ဒီ App ဆိုလည်းဒေါင်းထည့်ပြီးသုံးလိုက်လုပ်တာမျိုးတွေရှောင်သင့်ပါတယ်။ App တွေကို ဖုန်းထဲမှာစွတ်ထည့်ထားရင် ကိုယ့်ဖုန်းကို လေးလံစေသလို၊ ဘတ္ထရီအကုန်မြန်တာတို့၊ လိုင်းဖွင့်လိုက်တာနဲ့နောက်ကွယ်ကအသားကုန် Run ပြီး ထည့်ထားတဲ့ဖုန်းဘေလ်တွေကို ခနလေးနဲ့ကုန်အောင်လုပ်သွားတာတို ့သေခြာပေါက်ကြုံတွေ့ရမှာပါ။
အပေါ်မှာပြောထားသလို User data တွေကတော့ App ကို စပြီး install လုပ်ပြီးသွင်းလိုက်ကတည်းကသူတို ့ကဝင်ယူထားပြီးသွားပါပြီ။ ဒါကြောင့် တွေ့ကရာ App တွေကို လျှောက်ထည့်ပြီးသုံးတာမျိုးတွေရှောင်ကျဉ်ပါ၊ မလိုအပ်ပဲနဲ့App တွေကိုထည့်သွင်းထားတာမျိုးတွေမလုပ်ပါနဲ့လို့ပဲနောက်ဆုံးအနေနဲ ့ပြောချင်ပါတယ်။
Aung Kyaw Soe ( 4.2.2019 - 3:28 PM )
Video Credit: YTV
မူရင္းပို ့စ္ -

Android Phone တွေမှာ Screen Overlay Detected Error များ တက်ခဲ့ရင်
Permission Request တောင်း လို့ Allow ပေးရတဲ့နေရာ မှာ
Screen overlay detected ဆိုတာလေးပေါ်လာခဲ့ရင်တော့ အောက်ပါနည်းလေးတွေအတိုင်း
လိုက်ပြီးတော့လုပ်ကြည့်လိုက်ပါ တစ်နည်းမရ တစ်နည်းနဲ့အဆင်ပြေသွားပါလိမ့်မယ်။
ပထမနည်း -
သင့် ဖုန်းထဲက Setting ထဲက Application ထဲသွားပါ
Clean Master, File Manager, Antiviru App တွေကို Install လုပ်ထားခဲ့ရင် Unistall လုပ်ပေးလိုက်ပါ။
ဒုတိယနည်း -
 အခု တင်ထားတဲ့ပုံအတိုင်း တက်လာရင် Open Setting ထဲသွားပါ
Yes ဖြစ်နေတဲ့ဟာတွေ No ပေးလိုက်ပြီး On ဖြစ်နေတာ လေးတွေကို Off လုပ်ပေးလိုက်ပါ။
အားလုံး လုပ်ပီး သွားရင် စက်ကို Restart ချပေးလိုက်ပါ Screen Overlay Detected ဆိုတာကြီးကို
မြင်တွေ့ရတော့မှာမဟုတ်ပါဘူး။
အခြားသူတွေ ရေးထားတဲ့ နည်းတွေကိုတော့ အောက်မှာ ဝင်ရောက်ပြီး ဖတ်ရှုနိုင်ပါတယ်။
What to do when you get the annoying “screen overlay detected” message
Android has gotten a lot more user-friendly over the years, but there are still some things that can leave users scratching their heads. One of the most annoying recent Android problems is the “screen overlay detected” message. You’ll see this error message when trying to accept permissions or install an APK. The message is not exactly clear about what you need to do. If you’ve every experienced this frustrating message, we’ll help you get it resolved.
What does it mean?

The message appears when Android detects that another app is using a screen overlay. A screen overlay is when an app can appear on top of other apps. The floating Facebook chat bubbles and screen filter apps are common examples. It’s possible that an app could use a screen overlay to do something malicious while you accept permissions or install an APK. As a precaution, Android won’t let you do anything until the screen overlay is disabled. So let’s do that.
How to turn off screen overlay

The error message will tell you to “turn off the screen overlay in Settings > Apps.” Unfortunately, that’s where the instructions end. It doesn’t tell you how to find the responsible apps. We’ll help you snuff out the culprits.
Note: This process will be slightly different depending on your Android version and phone manufacturer.
- Go to Settings > Apps
- This step will vary by device. One of the following should work:
- Tap the gear icon in the top right
- Tap the three-dot menu icon > Configure apps
- If you see Draw over apps, tap it
- If you don’t, tap Special access under Advanced
- Then select Draw over apps
- If there is a drop-down at the top, select Apps with permission
- Select the app from the list
- Toggle off Permit drawing over other apps
Ref : http://phandroid.com
__________________________________________________
How to fix "Screen overlay detected" error
So, you’ve received the “screen overlay detected” message and have no idea what to do. Well, follow this step-by-step guide, and be troubled no longer.
Error message “Screen overlay detected”: the cause
The problem: Android suddenly warns you that a screen overlay has been detected.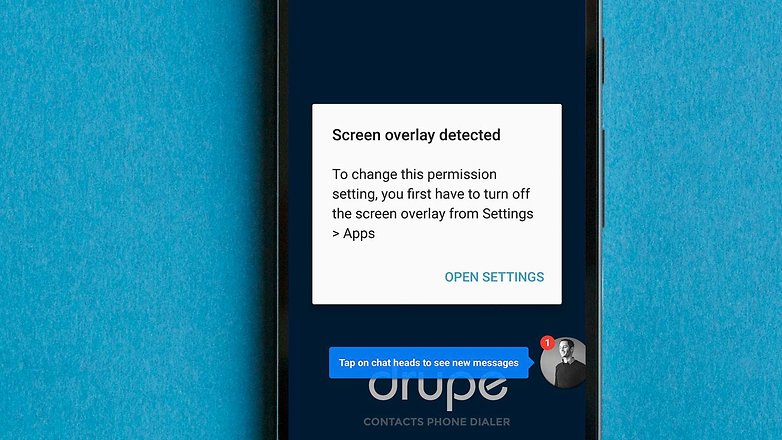
Affected Smartphones: Users across the internet have reported experiencing this problem on Samsung and Motorola smartphones. It seems likely to affect many manufacturers. AndroidPIT managed to replicate the behavior on a Vodafone and a Samsung smartphone.
Problem apps: We replicated the problem using Drupe, but CleanMaster, Lux and Twilight have all been blamed for the problem.

The solution: a step-by-step fix
Step one: "Screen overlay detected" fix
Find you what apps have permission to draw over the screen. On a non-Samsung smartphone, follow these steps:- Open the Settings
- Tap the magnifying glass at the top right
- Enter the search term “draw”
- Tap Draw over other apps
- Alternative route: Apps> [gear icon]> Draw over other apps
- Open the Settings
- Then Applications > Application manager
- Press on More > Apps that can appear on top

Step two
You will find yourself in front of a list of apps that have permission to use floating buttons or other screen overlays. Now you need to identify the problem app and temporarily deny it permission to draw over the screen. Here is are some pointers on how to identify the app that’s causing trouble:- Do you see an app bubble on your screen? If do, this app is almost certainly the cause. Either you hide the app bubble or disable the app in the list
- Do you have an app installed that changes the colors on the display or adjusts the brightness?
- Reportedly, Clean Master can be a trouble maker. If you see Clean Master in the list, disable it
- If there’s no obvious cause, disable everything

Step three
Now you can try launching the app again, and it should request permissions without the “Display overlay detected” error getting in the way.For Samsung users: We have also received a report that suggests the one-handed keyboard setting could be the root cause. Deactivate it by going to Settings> Advanced features > One-handed operation.

Step four: reactivate screen overlays
In order for the app(s) that you have disabled in step two to work again, you need to re-enable its overlay permissions. If you turned off all apps, it might be worth considering only reactivating those apps that you actually use.This is a rather inelegant workaround, but it's the best we have until Google makes the necessary changes to prevent app overlays from interfering with permission dialogues.
Has this guide helped? If you are still experiencing the error after following our guide, leave a comment, so we can try and address the problem.
Ref : https://www.androidpit.com

"Facebook Messenger New Feature Chat Message for Emoji"
သင္သိပါသလား Facebook Messenger ထဲမွာ Chat Message ေတြကုိ
ဒီလုိ လုပ္လုိ႔ရတယ္ဆုိတာ.... 😁😁😁

ဒီ New Feature လေးကတော့ Group Chat တွေအတွက်
အဆင်အပြေဆုံးဖြစ်မယ်ထင်ပါတယ် ဘာလို့လည်းဆိုတော့
ယခင်က တစ်ယောက်တစ်ပေါက် ပြောထားတာတွေကို
သဘောကျလို့ပဲဖြစ်ဖြစ် သဘောမကျလို့ပဲဖြစ်ဖြစ် လက်မပုံ
လေးကို အများဆုံးအသုံးပြုကြပါတယ် အဲ့ဒီမှာ ကိုယ်က Like
တာက Chat Message တစ်ခု အဲ့ဒီနောက်မှလာပြောထားတဲ့
Chat Message က တစ်ခုဆို ဘယ်ဟာကို လက်မထောင်လည်း
မသိတော့ပဲ ရောသွားတတ်ပါတယ်။
အခု အဲ့ဒီလို ဖြစ်ရပ်လေးတွေ မဖြစ်တော့အောင်
ကိုယ်သဘောကျတဲ့ Chat Message လေး တစ်ကြောင်းထဲကို
ရွေးပြီးတော့ Like Emoji လေး ပေးလို့ရပါပြီ Like တင်ပဲလား
ဆိုတော့ မဟုတ်ပါဘူး Emoji တွေအများကြီး ပါဝင်လာပါတယ်
ယခင်က သုံးမယ် မသုံးဘူး အငြင်းပွားနေခဲ့တဲ့ Dislike Emoji
လေးပါ ပါဝင်လာပါတယ် အဲ့ဒါက ဘယ်လိုလုပ်ရမှာလည်းဆိုတော့..
Chat
Message လေးတွေမှာ Smile icon လေးပေါ်တယ် ကွန်ပြူတာမှာရော ဖုန်းထဲမှာပါ
ရတယ် ဖုန်းထဲမှာဆို အဲ့ icon လေးပေါ်ဖိထားလိုက်ရင် ကြိုက်တဲ့ Emoji လေးကို
ရွေးပေးလို့ရပါတယ် ကွန်ပြူတာထဲမှာဆိုရင် အဲ့ဒီ icon လေးကို Click နှိပ်လိုက်ရင် emoji လေးတွေပေါ်လာပါတယ် စိတ်ကြိုက်
ရွေးချယ်ပြီး စာတစ်ကြောင်းချင်းစီကို နှစ်သက်ရာ လိုက်ဖက်မယ့်
Emoji လေးတွေ ပေးလို့ရနေပါပြီ။

ဖုန်းနဲ့သုံးနေတာဆို တစ်ခါတစ်ရံမှာ Smile icon လေးက
ပျောက်နေတတ်ပါတယ် အဲ့ဒီလိုဖြစ်နေရင် ကိုယ် ပေးချင်တဲ့ Chat Message စာကြောင်းလေးကို ဖိထားပြီး လွှတ်ကြည့်လိုက်ပါ
အဲ့ဒါဆို Emoji လေးတွေပေါ်လာပါလိမ့်မယ် စိတ်ကြိုက်
Emoji လေးတွေကို ရွေးချယ်ပြီး သုံးလို့ရသွားပါလိမ့်မယ်။

Messenger ကို Update လုပ်ဖို့လိုသလားဆိုရင် လိုနိုင်ပါတယ်
တစ်ချို့ Version အဟောင်းတွေ သုံးစွဲထားသူတွေမှာ မရသေးဘူးလို့
ပြောဆိုနေကြပါတယ် Version - 110.0.0.14.69 ကတော့ ကျွန်တော်
လက်ရှိ သုံးစွဲပြီး Chat Message တစ်ကြောင်းစီအတွက် Emoji တွေ
ရနေတဲ့ ဗားရှင်းပါ မရသေးသူများ Messenger ကို Update ပြုလုပ်
ကြည့်လိုက်ပါ။
#Facebook #Messenger #FacebookMessenger #Emoji

လုပ်လို့ရတာတွေ အများကြီး တစ်ခါက ကိုပြည့် ( X Code ) ဆိုင်ရောက်တော့ သူပြောဖူးတာ တစ်ခါ ကြားဘူးတယ် ဖုန်းတစ်လုံးကို စိတ်ကြိုက်ပြုပြင်ပြီး လူတစ်ယောက်ယောက်ကို လက်ဆောင်ပေးပြီး သူဘာလုပ်လည်း ဘာပြောလည်း သူ့ဖုန်းထဲမှာ ဘာပုံတွေ ဘာ Video တွေရှိလည်း သိနိုင်တယ်ဆိုတာရယ် အဝေးကနေ လှမ်းပြီး ယူလို့ရတယ်ဆိုတာရယ်ပါ ပြောပြဘူးတယ်။ ( ဒါက တစ်ခု )
နောက်တစ်ခုက Viber အကောင့်ထဲဝင်ပြီး Email လေးထည့်လိုက်တာနဲ့
အဲ့ဒီ Viber အသုံးပြုမှု နဲ့ Phone Number, Message, Photo, Video, Other File လေးတွေ ကို Zip ဖိုင်နဲ့ မေးလ်ကို ပို့ပေးတယ်။ ( ဒါက တစ်ခု )
ပြီးတော့ ကိုယ်က Spy လုပ်ချင်တဲ့သူရဲ့ ဖုန်းနံပါတ်ကို သိမယ် ဒါဆို
အဲ့ဒီနံပါတ်က Viber သုံးတယ် မသုံးဘူးဆိုတာ Checkup လုပ်မယ်
သုံးတာသေခြာတယ်ဆို SE ထိုးပြီး ကိုယ့် Phone or PC မှာ
သူ့ဖုန်းနံပါတ်ကို အသုံးပြုပြီး Verify လုပ်မယ် ကိုယ်လုပ်တဲ့အချိန်မှာ
တစ်ဖက်ဖုန်းထဲကို ဝင်မယ့် အသက်သွင်းတဲ့ Code ကို တော့ SE ထိုးပြီး
မရ ရအောင်တောင်းပေါ့ ရပြီဆိုရင် သူ့ဖုန်းထဲဝင်သမျှ Data လည်း
ကိုယ့်ဘက်ကို တစ်ပြိုင်ထဲဝင်မယ် ဒါဆို ဘာလုပ်လုပ် လုပ်ချင်တာလုပ်လို့
ရပြီပေါ့။ ( ဒါက တစ်နည်း )
နောက်ပြီးတော့ Android Rat တွေ ဘာတွေထည့်ထားမယ် Malware တွေ ထည့်ထားပြီး Data တွေကို စစ်ထုတ်ယူနေမယ်ဆို ဘယ်လိုလုပ်မတုန်း။
နောက်တစ်ခုက ဖြစ်နိုင်တာက အစိုးရပိုင်းက လူတွေ သတင်းအချက်အလက် အမြန်ရဖို ့ဆိုပြီး Viber Chat Group လုပ်ထားတာ မြင်ဖူးတယ် အဲ့ဒီထဲမှာ လူပေါင်း သောင်းခြောက်ထောင် အစုံရှိတယ် အဲ့ဒီ တစ်ယောက်ကိုယ်တိုင်လည်း ဘယ်သူတွေ ဘယ်ဝါတွေမသိဘူး Chat Admin တွေလည်း ကိုယ့် ဖုန်းထဲမှာမရှိတဲ့ နံပါတ် ဖြစ်နေလည်း မထုတ်ရဲကြဘူး ထုတ်လိုက်လို့ လူကြီးတစ်ယောက်ယောက် ဖုန်းဖြစ်နေရင် ကွိုင်မှာကိုး ခု အချက်အလက်တွေ ပေါက်ကြားတယ်ဆိုတာကတော့ သူတို့ထဲက တစ်ယောက်ယောက် တမင်ဖွင့်ချတာ ဖြစ်နိုင်သလို အဲ့ဒီ ထဲဝင်နေတဲ့ သူတို့မသိတဲ့ သူတစ်ယောက်ယောက်က အဲ့ဒီ ရောက်နေလို့ ဒေတာရပြီး ပြန်ဖြန် ့တာလည်းဖြစ်နိုင်တယ်။
အခြားနည်းတွေတော့ရှိပါသေးတယ် ဟိုနေ့က BarCamp Yangon 2017 မှာ ပြောသွားတာလေးတစ်ခု ထပ်ပြီး နားထောင်ခဲ့ရတယ် အဲ့ဒါက ဘာလည်းဆိုတော့ ခုလို Smart Phone မှမဟုတ်ဘူး အရင်တုန်းက Keypad Phone ခေတ်တုန်းကတောင် အားကုန်လို့ သို့မဟုတ် Power off ထားတယ် ဆိုရင်တောင် အဲ့ဒီဖုန်းကိုသုံးပြီး ဆက်သွယ်ရေးနဲ့အစိုးရပိုင်းကနေ ပေါင်းပြီး အသံ Record လုပ်လို့ရတယ် နားထောင်လို့ရတယ် GPS စနစ်နဲ့ Location အတိအကျ ဘယ်နားမှာ ဆိုတာ သိအောင်လုပ်လို့ရတယ်ပြောတယ်။
ဒီတော့ ပြောချင်တာက နည်းပညာလောကမှာ ကိုယ်မသိသေးတာတွေအများကြီးပါ လိုက်မမှီနိုင်တာတွေအများကြီးပါ မဖြစ်နိုင်ဘူးဆိုတာတွေမရှိသလောက်ရှားတယ် မဖြစ်သေးတဲ့အဆင့်ပဲရှိရင်ရှိပါလိမ့်မယ် ဒါကြောင့် ဘုရားဟောလိုပဲ အလယ်အလတ် လမ်းစဉ်အတိုင်းပဲ ကျင့်ကြပါ တွေးကြပါလို့ပဲပြောချင်ပါတယ်။ :D
:D
Aung Kyaw Soe ( 31.1.2017 - 5:20 PM )
အဲ့ဒီ Viber အသုံးပြုမှု နဲ့ Phone Number, Message, Photo, Video, Other File လေးတွေ ကို Zip ဖိုင်နဲ့ မေးလ်ကို ပို့ပေးတယ်။ ( ဒါက တစ်ခု )
ပြီးတော့ ကိုယ်က Spy လုပ်ချင်တဲ့သူရဲ့ ဖုန်းနံပါတ်ကို သိမယ် ဒါဆို
အဲ့ဒီနံပါတ်က Viber သုံးတယ် မသုံးဘူးဆိုတာ Checkup လုပ်မယ်
သုံးတာသေခြာတယ်ဆို SE ထိုးပြီး ကိုယ့် Phone or PC မှာ
သူ့ဖုန်းနံပါတ်ကို အသုံးပြုပြီး Verify လုပ်မယ် ကိုယ်လုပ်တဲ့အချိန်မှာ
တစ်ဖက်ဖုန်းထဲကို ဝင်မယ့် အသက်သွင်းတဲ့ Code ကို တော့ SE ထိုးပြီး
မရ ရအောင်တောင်းပေါ့ ရပြီဆိုရင် သူ့ဖုန်းထဲဝင်သမျှ Data လည်း
ကိုယ့်ဘက်ကို တစ်ပြိုင်ထဲဝင်မယ် ဒါဆို ဘာလုပ်လုပ် လုပ်ချင်တာလုပ်လို့
ရပြီပေါ့။ ( ဒါက တစ်နည်း )
နောက်ပြီးတော့ Android Rat တွေ ဘာတွေထည့်ထားမယ် Malware တွေ ထည့်ထားပြီး Data တွေကို စစ်ထုတ်ယူနေမယ်ဆို ဘယ်လိုလုပ်မတုန်း။
နောက်တစ်ခုက ဖြစ်နိုင်တာက အစိုးရပိုင်းက လူတွေ သတင်းအချက်အလက် အမြန်ရဖို ့ဆိုပြီး Viber Chat Group လုပ်ထားတာ မြင်ဖူးတယ် အဲ့ဒီထဲမှာ လူပေါင်း သောင်းခြောက်ထောင် အစုံရှိတယ် အဲ့ဒီ တစ်ယောက်ကိုယ်တိုင်လည်း ဘယ်သူတွေ ဘယ်ဝါတွေမသိဘူး Chat Admin တွေလည်း ကိုယ့် ဖုန်းထဲမှာမရှိတဲ့ နံပါတ် ဖြစ်နေလည်း မထုတ်ရဲကြဘူး ထုတ်လိုက်လို့ လူကြီးတစ်ယောက်ယောက် ဖုန်းဖြစ်နေရင် ကွိုင်မှာကိုး ခု အချက်အလက်တွေ ပေါက်ကြားတယ်ဆိုတာကတော့ သူတို့ထဲက တစ်ယောက်ယောက် တမင်ဖွင့်ချတာ ဖြစ်နိုင်သလို အဲ့ဒီ ထဲဝင်နေတဲ့ သူတို့မသိတဲ့ သူတစ်ယောက်ယောက်က အဲ့ဒီ ရောက်နေလို့ ဒေတာရပြီး ပြန်ဖြန် ့တာလည်းဖြစ်နိုင်တယ်။
အခြားနည်းတွေတော့ရှိပါသေးတယ် ဟိုနေ့က BarCamp Yangon 2017 မှာ ပြောသွားတာလေးတစ်ခု ထပ်ပြီး နားထောင်ခဲ့ရတယ် အဲ့ဒါက ဘာလည်းဆိုတော့ ခုလို Smart Phone မှမဟုတ်ဘူး အရင်တုန်းက Keypad Phone ခေတ်တုန်းကတောင် အားကုန်လို့ သို့မဟုတ် Power off ထားတယ် ဆိုရင်တောင် အဲ့ဒီဖုန်းကိုသုံးပြီး ဆက်သွယ်ရေးနဲ့အစိုးရပိုင်းကနေ ပေါင်းပြီး အသံ Record လုပ်လို့ရတယ် နားထောင်လို့ရတယ် GPS စနစ်နဲ့ Location အတိအကျ ဘယ်နားမှာ ဆိုတာ သိအောင်လုပ်လို့ရတယ်ပြောတယ်။
ဒီတော့ ပြောချင်တာက နည်းပညာလောကမှာ ကိုယ်မသိသေးတာတွေအများကြီးပါ လိုက်မမှီနိုင်တာတွေအများကြီးပါ မဖြစ်နိုင်ဘူးဆိုတာတွေမရှိသလောက်ရှားတယ် မဖြစ်သေးတဲ့အဆင့်ပဲရှိရင်ရှိပါလိမ့်မယ် ဒါကြောင့် ဘုရားဟောလိုပဲ အလယ်အလတ် လမ်းစဉ်အတိုင်းပဲ ကျင့်ကြပါ တွေးကြပါလို့ပဲပြောချင်ပါတယ်။
Aung Kyaw Soe ( 31.1.2017 - 5:20 PM )

"Telenor SIM Card Online Registration Tutorial - Telenor ဆင်းကတ်မှတ်ပုံတင်ရန်(တင်နည်း)"
ဒါကတော့ Telenor SIM Card ကို Online ကနေ မှတ်ပုံတင်နည်း လေးပဲဖြစ်ပါတယ်
ပထမဦးဆုံးအေနနဲ ့ မှတ်ပုံတင်ကို ဖုန်းနဲ့အနီးကပ် ရှေ့ဖက် ၁ ပုံ နောက်ကျောဘက် ၁ ပုံရိုက်ထားလိုက်ပါ ( Scan ဖတ်ထားရင်တော့ပိုကောင်းပါတယ် လူတိုင်းအတွက်အဆင်မပြေနိုင်လို့ ဖုန်းနဲ့ပဲ အနီးကပ် ထင်ထင်ရှားရှားရိုက်ခိုင်းလိုက်တာပါ ) ပြီးသွားရင် ဒီလင့် Telenor SIM Card Online Registration လေးကို နှိပ်ပြီးသွားလိုက်ပါ။

၁။ ပေးထားတဲ့ Link ကနေ ဝင်လိုက်ရင် အဲ့ဒီနေရာလေးကိုရောက်သွားပါမယ် စတင်မည် ဆိုတာလေးကို
နှိပ်ပြီးဝင်လိုက်ပါ။

၂။ အပေါ်ကပုံကိုသေခြာကြည့်ပါ မိမိ မှတ်ပုံတင်မည့် ဖုန်းနံပါတ်ကို ထည့်ပြီး Sign in ဆိုတာလေးကို
နှိပ်ပေးလိုက်ပါ အဲ့ဒါဆိုရင် ဖုန်းထဲကို Code လေးပို့လာပါမယ်လိမ့်မယ်။

၃။ ဒီအဆင့်မှာ စောစောက ဖုန်းထဲကို ပို့လာတဲ့ Code လေးကို ပြထားတဲ့နေရာမှာထည့်ပြီးတော့
Sign in ဆိုတာလေးကို နှိပ်ပေးလိုက်ပါ။

၄။ အပေါ်က ပုံအတိုင်းမြင်တွေ့ရပြီဆိုရင် သင့်ရဲ့ဖုန်းနံပါတ်က မှတ်ပုံတင်ထားပြီးဖြစ်နေပါပြီ သို့သော်လည်း
မှတ်ပုံတင်နံပါတ်က ကိုယ့်မှတ်ပုံတင် နံပါတ်မဟုတ်ဘူးဆိုရင် ကိုယ့်မှတ်ပုံတင်နဲ့ပဲ တင်ချင်တယ်ဆိုရင်တော့
Telenor Showroom မှာသွားပြီး ဒီဖုန်းနံပါတ်က ကျွန်တော့်မှတ်ပုံတင်နဲ့မဟုတ်ပဲ အခြားမှတ်ပုံနဲ့ မှတ်ပုံတင်ထားလို့ ပြောင်းပြီး ကိုယ့်မှတ်ပုံတင်နဲ ့ကိုယ် တင်ချင်ပါတယ် အဲ့ဒီ မှတ်ပုံတင်ထားမှုကို ပယ်ဖျက်ပေးပါလို့ သွားရောက်ပြီး ပြောဆိုလို့ရပါတယ် တကယ်လို့ ကိုယ်က မပြောင်းချင်ဘူး ဒီတိုင်းပဲ ထားချင်တယ်ဆိုလဲ ထားလိုက်လို့ရပါတယ် အဲ့ဒီ ကိုယ့်ဖုန်းနံပါတ်ကို မှတ်ပုံတင်ထားတဲ့ နံပါတ်က ဆင်းကတ်ဝယ်လာတဲ့ ဖုန်းဆိုင် သို့မဟုတ် လမ်းဘေးက ဆင်းကတ်ပြန်လည်ရောင်းချသူ တစ်ဦးဦးရဲ့ မှတ်ပုံတင်နဲ ့မှတ်ပုံတင်ထားတာဖြစ်လို့ အဲ့ဒီဖုန်းနံပါတ်နဲ့ အမှုအခင်းတွေ အရှုပ်အရှင်းတွေ ဖြစ်လာခဲ့ရင်
အဲ့ဒီ ဝယ်ရောင်းသမားပဲ အမှုပတ်မှာပါ ( ဝယ်ရောင်းသမားတွေ ဒါကို သတိထားပြီး အော်ပရေတာတွေဆီမှာ သွားရောက်ပြီး ပယ်ဖျက်ဖို့လိုပါတယ် ) ဒါကြောင့် အဲ့လို ပြနေရင် အဲ့ဒီဖုန်းကတ်ကို ကိုင်ထားသူအနေနဲ့ ဒီအတိုင်းပဲ ထားလိုက်ရင် ရသလို ကိုယ့်အမည်ပေါက် ကိုယ့်မှတ်ပုံတင်နဲ ့ပြောင်းလဲပြီး တင်ချင်တယ်ဆိုလဲ
Telenor Showroom တွေမှာ သွားရောက် ပြောဆိုပြီး ပြင်ဆင် ပြောင်းလဲလို့ရပါမယ်။
 | |
| ပုံ - ၁ ( ရှေ့သို့ ဆိုတာကို နှိပ်ပါ ) |
 |
| ပုံ - ၂ ( ရှေ့သို့ဆိုတာကို နှိပ်ပါ ) |
၅။ တကယ်လို့အဆင့်( ၂ ) နေရာမှာ ဒီပုံစံအတိုင်း မြင်တွေ့ခဲ့ရင်တော့ သင့်ရဲ့ဖုန်းနံပါတ်ဟာ မှတ်ပုံတင် ထားခြင်း မရှိသေးပါဘူး ဒါကြောင့် ရှေ့သို့ ဆိုတာလေးကို နှိပ်ပြီး နောက်တဆင့်ကိုသွားလိုက်ပါ။

၆။ အဆင့် ( ၃ ) နေရာမှာ သူက ပုံ ၃ ပုံတောင်းထားတယ် ဒါပေမယ့် မှတ်ပုံတင်က အဓိကမို့လို့ အောက်ဆုံး
နေရာမှာ ပုံမထည့်လဲရပါတယ် အပေါ် မှတ်ပုံတင် ရှေ့ဘက် နဲ့ နောက်ဖက်ကိုပဲ တင်ပေးလိုက်ရင်ရပါပြီ ဘယ်ကနေ တင်ရမလဲဆိုရင် Browse ဆိုတာလေးကိုနှိပ်ပြီး ကိုယ်ရိုက်ထားတဲ့ မှတ်ပုံတင် ရှေ့ဘက်နဲ့
နောက်ကျောဘက်ကို တင်ပေးရမှာပါ။

၇။ အထက်ပါပုံအတိုင်း မှတ်ပုံတင်ရှေ့ဘက် နဲ့ နောက်ဘက်ကို Upload တင်ပြီးရင် အောက်က ဝိုင်းပြထားတဲ့ နေရာလေး နှစ်ခုမှာ အမှန်ခြစ်လေးတွေပေးပါ ပြီးလျှင် အတည်ပြုမည် ဆုိတာကုိႏွိပ္ပါ။
( အထက်ပါပုံထဲမှ မှတ်ပုံတင်ကို အချက်အလက်များ တမင်တကာ ဖျက်ထားခြင်းဖြစ်ပါသည် အဲ့လို ဖျက်ပြီး တင်ရမှာမဟုတ်ဘူးဆိုတာကို သိစေအပ်ပါသည်။ )

၈။ အထက်ပါအတိုင်း မြင်တွေ့ရပြီဆိုလျှင် သင့်ရဲ့တယ်လီနောဖုန်းနံပါတ်ကို မှတ်ပုံတင်ခြင်း ပြီးဆုံးသွားပြီပဲ
ဖြစ်ပါတယ် Telenor Apps ကို ဒေါင်းချင်တယ်ဆိုရင်တော့ ဒေါင်းလုပ် လုပ်ရန် နှိပ်ပါ ဆိုတာလေးထဲက
နှိပ်ပါ ဆိုတာလေးကို နှိပ်ပြီး Download ပြုလုပ်နိုင်ပါတယ် မဒေါင်းချင်ဘူးဆိုလဲ မူလ ဆိုတာလေးကိုနှိပ်ပြီး
Telenor SIM Card Online Registration ကို အဆုံးသတ်လိုက်လို့ရပါပြီဗျာ။ :D
အားလုံး အဆင်ပြေလွယ်ကူစွာဖြင့် Telenor SIM Card Online Registration ကို လုပ်ဆောင်နိုင်ကြပါစေ။
စိတ်ရှည်လက်ရှည်နဲ့လာရောက် ဖတ်ရှုအားပေးသူများအားလုံးကို အထူးကျေးဇူးတင်ရှိလျက်...
လေးစားစွာဖြင့်....